Xcode 9.3 にしたら IDEWorkspaceChecks.plist というファイルが作られたが何者なのか

Xcode 9.3 でプロジェクトを開いただけで Hoge.xcworkspace/xcshareddata/IDEWorkspaceChecks.plist というファイルが作られた。

Release Note を見ると以下のように書いてある。

Xcode 9.3 adds a new IDEWorkspaceChecks.plist file to a workspace's shared data, to store the state of necessary workspace checks. Committing this file to source control will prevent unnecessary rerunning of those checks for each user opening the workspace. (37293167) https://developer.apple.com/library/content/releasenotes/DeveloperTools/RN-Xcode/Chapters/Introduction.html

どうやら .gitignore せずにソース管理した方がよさそう。ワークスペースのチェックを無駄に実行しないで済むっぽい (なんのことかよくわからないが...)。

ちなみに初期状態のファイルの中身はこうなっていた。

<?xml version="1.0" encoding="UTF-8"?>
<!DOCTYPE plist PUBLIC "-//Apple//DTD PLIST 1.0//EN" "http://www.apple.com/DTDs/PropertyList-1.0.dtd">
<plist version="1.0">
<dict>
    <key>IDEDidComputeMac32BitWarning</key>
    <true/>
</dict>
</plist>

Cloud Functions は global 変数から Function Name などを取得できる

Cloud Functions で以下のコードを実行して見ると、現在実行している関数の名前を取得できる。

console.log(global.process.env.FUNCTION_NAME) // -> createUser

他にも GCP_PROJECT, FUNCTION_MEMORY_MB, FUNCTION_TIMEOUT_SEC などが env から取得できる。実際に取得できる env は以下。

env { X_GOOGLE_CODE_LOCATION: '/user_code',
  WORKER_PORT: '8091',
  X_GOOGLE_SUPERVISOR_INTERNAL_PORT: '8081',
  X_GOOGLE_WORKER_PORT: '8091',
  FUNCTION_IDENTITY: 'hoge@appspot.gserviceaccount.com',
  X_GOOGLE_FUNCTION_REGION: 'us-central1',
  GCLOUD_PROJECT: 'hoge',
  FUNCTION_NAME: 'functionName',
  X_GOOGLE_FUNCTION_MEMORY_MB: '256',
  SUPERVISOR_HOSTNAME: '192.168.1.1',
  PATH: '/usr/local/bin:/usr/bin:/bin',
  X_GOOGLE_GCLOUD_PROJECT: 'hoge',
  FUNCTION_REGION: 'us-central1',
  PWD: '/user_code',
  FUNCTION_TRIGGER_TYPE: 'OTHER_EVENT_TRIGGER',
  FUNCTION_TIMEOUT_SEC: '60',
  X_GOOGLE_FUNCTION_TRIGGER_TYPE: 'OTHER_EVENT_TRIGGER',
  NODE_ENV: 'production',
  SHLVL: '1',
  X_GOOGLE_FUNCTION_NAME: 'functionName',
  X_GOOGLE_ENTRY_POINT: 'functionName',
  X_GOOGLE_FUNCTION_IDENTITY: 'hoge@appspot.gserviceaccount.com',
  X_GOOGLE_GCP_PROJECT: 'hoge',
  CODE_LOCATION: '/user_code',
  GCP_PROJECT: 'hoge',
  FUNCTION_MEMORY_MB: '256',
  X_GOOGLE_SUPERVISOR_HOSTNAME: '192.168.1.1',
  PORT: '8080',
  SUPERVISOR_INTERNAL_PORT: '8081',
  X_GOOGLE_FUNCTION_TIMEOUT_SEC: '60',
  ENTRY_POINT: 'payOrder',
  OLDPWD: '/var/tmp/worker/',
  _: '/usr/bin/env',
  HOME: '/tmp' }

これらを使うと、メタ的に Function Name を取得できるので、ライブラリ側で関数名を読み取ることができる。
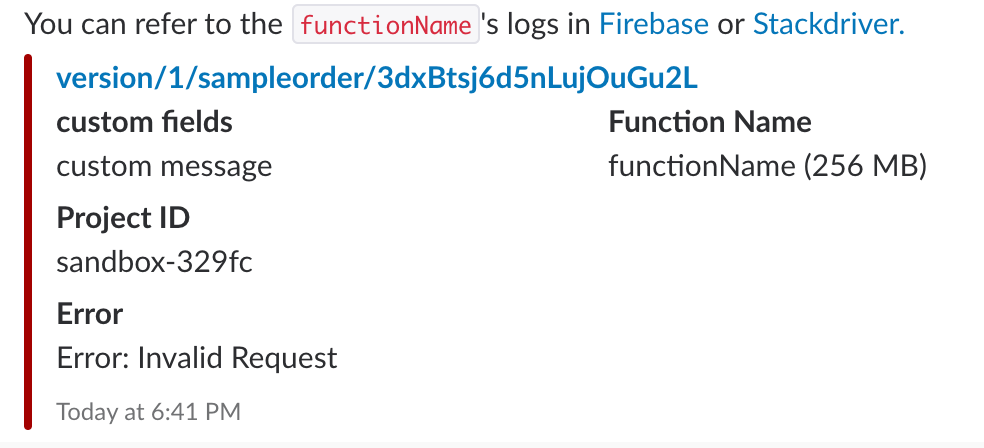
starhoshi/fire-slack では明示的に関数名を指定しないでも勝手に Slack 通知に関数名を載せるようにした。

await Slack.send(
  { webhook: {}, ref: reference, error: Error('Invalid Request') }
)

このコードだけでこんな通知を送れる。
f:id:star__hoshi:20180329184453p:plain

env 以外にもこんなのが取得できるが、使い道はなさそう。

global { global: [Circular],
  process: 
   process {
     title: '/nodejs/bin/node',
     version: 'v6.11.5',
     moduleLoadList: 
      [ 'Binding contextify',
        'Binding natives',
        'Binding config',
        'NativeModule events',
        'NativeModule util',
        'Binding uv',
        'NativeModule buffer',
        'Binding buffer',
        'Binding util',
        'NativeModule internal/util',
        'NativeModule timers',
        'Binding timer_wrap',
        'NativeModule internal/linkedlist',
        'NativeModule assert',
        'NativeModule internal/process',
        'NativeModule internal/process/warning',
        'NativeModule internal/process/next_tick',
        'NativeModule internal/process/promises',
        'NativeModule internal/process/stdio',
        'Binding constants',
        'NativeModule path',
        'NativeModule module',
        'NativeModule internal/module',
        'NativeModule vm',
        'NativeModule fs',
        'Binding fs',
        'NativeModule stream',
        'NativeModule internal/streams/legacy',
        'NativeModule _stream_readable',
        'NativeModule internal/streams/BufferList',
        'NativeModule _stream_writable',
        'NativeModule _stream_duplex',
        'NativeModule _stream_transform',
        'NativeModule _stream_passthrough',
        'Binding fs_event_wrap',
        'NativeModule domain',
        'NativeModule tty',
        'NativeModule net',
        'NativeModule internal/net',
        'Binding cares_wrap',
        'Binding tty_wrap',
        'Binding tcp_wrap',
        'Binding pipe_wrap',
        'Binding stream_wrap',
        'NativeModule http',
        'NativeModule _http_incoming',
        'NativeModule _http_common',
        'Binding http_parser',
        'NativeModule internal/freelist',
        'NativeModule _http_outgoing',
        'NativeModule _http_server',
        'NativeModule _http_agent',
        'NativeModule _http_client',
        'NativeModule url',
        'Binding icu',
        'NativeModule querystring',
        'NativeModule crypto',
        'Binding crypto',
        'NativeModule internal/streams/lazy_transform',
        'NativeModule string_decoder',
        'NativeModule console',
        'NativeModule zlib',
        'Binding zlib',
        'NativeModule cluster',
        'NativeModule dgram',
        'Binding udp_wrap',
        'NativeModule child_process',
        'Binding spawn_sync',
        'NativeModule internal/child_process',
        'Binding process_wrap',
        'NativeModule internal/socket_list',
        'NativeModule internal/cluster',
        'Binding signal_wrap',
        'NativeModule os',
        'Binding os',
        'NativeModule https',
        'NativeModule tls',
        'NativeModule _tls_common',
        'NativeModule _tls_wrap',
        'NativeModule _stream_wrap',
        'Binding js_stream',
        'Binding tls_wrap',
        'NativeModule _tls_legacy',
        'NativeModule punycode',
        'NativeModule dns',
        'NativeModule constants' ],
     versions: 
      { http_parser: '2.7.0',
        node: '6.11.5',
        v8: '5.1.281.108',
        uv: '1.11.0',
        zlib: '1.2.11',
        ares: '1.10.1-DEV',
        icu: '58.2',
        modules: '48',
        openssl: '1.0.2l' },
     arch: 'x64',
     platform: 'linux',
     release: 
      { name: 'node',
        lts: 'Boron',
        sourceUrl: 'https://nodejs.org/download/release/v6.11.5/node-v6.11.5.tar.gz',
        headersUrl: 'https://nodejs.org/download/release/v6.11.5/node-v6.11.5-headers.tar.gz' },
     argv: [ '/nodejs/bin/node', '/var/tmp/worker/worker.js' ],
     execArgv: [ '--max-old-space-size=256' ],
     env: ...

Firestore のクエリで「存在しないこと」をチェックしたい場合、事前に null を入れておく

Firestore でこんなモデルを作ったとする。

admin.firestore().collection('user').add({
  startDate: new Date(),
  name: 'hoge'
})

このモデルに対し、「 endDate に値が入っていないもの」をクエリで取得したいとする。
パッと思いつくクエリはこう。

admin.firestore().collection('user')
  .where('endDate', '==', undefined)
  .get()

しかし、 undefined はクエリとして指定することができない。困った。

事前に null を入れておく

admin.firestore().collection('user').add({
  startDate: new Date(),
  name: 'hoge',
  endDate: null
})
admin.firestore().collection('user')
  .where('endDate', '==', null)
  .get()

is null を確認したい場合は、事前に null を入れてデータを作っておく。
後になって is null でクエリを書こうとしてもダメなので、事前に null を入れましょう。

false ならいけそうな気がしたがダメだった

データがあれば true, なければ false というような、js のようにふわっとかけないかなと思ったけどダメだった。
true / false はちゃんと真偽値しか検索に引っかからないようだ。

東雲めぐの配信を目覚まし時計にする on Mac

東雲めぐ(@megu_shinonome)

東雲めぐは平日朝 07:30 から生放送をしている VTuber (SHOWROOMER) であり、録画が残らないので毎朝ちゃんと起きねばならない。
この配信を目覚まし時計にすることで毎朝健康的な時間に目覚めることができる。

www.showroom-live.com

1. カレンダーに配信ページを開く設定をする

1-1. weblock の取得

こんな感じで、ブラウザの URL をデスクトップにドラッグ&ドロップすると webloc ファイルを入手できる。

f:id:star__hoshi:20180327090749g:plain

1-2. カレンダーの設定

Mac のカレンダーアプリに webloc を開く設定をする。

  • 時刻
    • 07:27 ~ 08:00
  • 繰り返し
    • 月曜 ~ 金曜
  • 通知
    • カスタム
      • ファイルを開く
      • 先ほど保存した webloc ファイルを開くファイルとして設定

f:id:star__hoshi:20180327090945p:plain

これでカレンダーアプリの設定はおわり。

2. スリープ解除

スリープしてない人はいいけど、スリープの設定している人はやる。

設定アプリ > 省エネルギー > スケジュール にスリープ解除のスケジュール設定をする。下記 Gif のようにすれば OK。

image

これで 07:30 前に PC が起動して東雲めぐの配信が自動でつくようになった。「カンカンかんカンカン!!!!朝だよ〜〜〜〜」という声で起こしてくれる。

注意

  • 寝る前に音量を MAX にしておくこと
    • これは AppleScript とかで解決できそうだけどやってない
  • Mac のロックは解除されないので起きてから解除する
    • ロック解除されずとも裏で配信は再生されているので声は聞こえる

おまけ

Mornin'

指定した時間にカーテンを開けてくれる、07:20 くらいにカーテンが開くような設定をしている。

mornin.jp

Nature Remo

赤外線リモコンで消せる電球を使っているならこれで指定した時刻にリモコンを動かせる。07:27 くらいに電気がつくようにしている。

nature.global

Firebase HTTPS Callable Functions を type-safe に叩けるライブラリ

Firebase HTTPS callable function を試してみる に使い方は書いたが、素のまま SDK を使うのは厳しいので APIKit っぽく Endpoint を定義できていい感じに Function を叩けるようなライブラリを作った。

github.com

endpoint の pathDecodable な Response を定義して、必要なら parameter をセットすると動く。
(APIKit の Request っぽい感じ)

import Callable

struct SampleResponse: Decodable {
    let name: String
}

struct Sample: Callable {
    typealias Response = SampleResponse
    let name: String

    init(name: String) {
        self.name = name
    }

    var path: String {
        return "httpcallable"
    }

    var parameter: [String: Any]? {
        return ["name": name]
    }
}

使う側はこうなる、返り値は Result。

let sample = Sample(name: "Jobs")
sample.call { result in
    switch result {
    case .success(let resonse):
        print(resonse)
    case .failure(let error):
        print(error)
    }
}

エラー

エラーは 3 パターン定義していて

  • function(Error)
    • Cloud Functions から返ってくる素のエラー
  • decode(Error)
    • Decodable で失敗した
  • illegalCombination(Any?, Error?)
    • result も error もどちらも返ってきた or どちらも nil
    • 注意 に書いたが、無が返ってくることがある

というのを用意している。まだ作ってみただけで実運用していないので、増やすかもしれない。

終わり

という感じで、 Endpoint を定義して、 Response は Decodable でいい感じに書けるようになった。

尚、テストはない...。

Cloud Functions for Firebase の環境変数設定後は関数の再デプロイが必要なので注意

ドキュメントにも書いてあることだが、環境変数変更後は関数の再デプロイが必要。

「functions:config:set」を実行した後は、新しい設定を使用可能にするために関数を再デプロイする必要があります。 https://firebase.google.com/docs/functions/config-env?hl=ja#set_environment_configuration_for_your_project

環境変数、動的に変えられるものだと思ってたんだけど勘違いだったっぽい。
そもそもなんで動的に変えられると思ってたのか思い出せない...。

続・イケてない JSON を Swift の Decodable で扱いやすいモデルにデコードする

イケてない JSON を Swift の Decodable で扱いやすいモデルにデコードする の続き。
今度も last.fmuser.getRecentTracks を Decode していく。

尚、文字を打つのが面倒になったためこの記事はあらゆる説明を省略している。

JSON

これを decode していく。

{
    "recenttracks": {
        "track": [
            {
                "artist": {
                    "#text": "TOKIO",
                    "mbid": "d210bd3e-68db-4987-a714-0214449e361d"
                },
                "name": "宙船",
                "streamable": "0",
                "mbid": "",
                "album": {
                    "#text": "Harvest",
                    "mbid": "3824d059-6f1a-4163-ae1a-65d5f87bee38"
                },
                "url": "https://www.last.fm/music/TOKIO/_/%E5%AE%99%E8%88%B9",
                "image": [
                    {
                        "#text": "https://lastfm-img2.akamaized.net/i/u/34s/1a20e578c4ea44c0a8cde03d6c6cc014.png",
                        "size": "small"
                    },
                    {
                        "#text": "https://lastfm-img2.akamaized.net/i/u/64s/1a20e578c4ea44c0a8cde03d6c6cc014.png",
                        "size": "medium"
                    }
                ],
                "@attr": {
                    "nowplaying": "true"
                }
            },
            ...............
        ],
        "@attr": {
            "user": "star__hoshi",
            "page": "1",
            "perPage": "50",
            "totalPages": "807",
            "total": "40316"
        }
    }
}

List 系 API の共通要素

last.fm の List 系 API は、データ本体の配列と attr という API メタデータの 2 つから構成されていて他の API でも同じなので ListResponse という protocol を用意した。
この List に RecentTrack や TopTrack を入れると Generics でいい感じになる。

public protocol ListResponse {
    associatedtype List

    var list: [List] { get }
    var attr: Attr { get }
}

public struct Attr: Decodable {
    public let user: String
    public let page: Int
    public let perPage: Int
    public let totalPages: Int
    public let total: Int
}

protocol を実装するとこんな感じになる。

    public struct RecentTracksResponse: ListResponse, Decodable {
        public typealias List = RecentTrack
        public let list: [List]
        public let attr: Attr

        private enum CodingKeys: String, CodingKey {
            case list
            case attr
        }

        private enum RecentTracksKeys: String, CodingKey {
            case recenttracks
        }

        private enum TrackAttrKeys: String, CodingKey {
            case track
            case attr = "@attr"
        }

        public init(from decoder: Decoder) throws {
            let values = try decoder.container(keyedBy: RecentTracksKeys.self)
            let recentTracks = try values.nestedContainer(keyedBy: TrackAttrKeys.self, forKey: .recenttracks)
            self.attr = try recentTracks.decode(Attr.self, forKey: .attr)
            self.list = try recentTracks.decode([List].self, forKey: .track)
        }
    }

配列の中身を decode

nowplaying がネストしててもしょうもないので、 @attr で decode してそこからさらに nowplaying で decode するようにした。
last.fmAPI は本当にひどいので、 nowplaying が false 場合はそもそも @attr が空っぽになってる。なので if decoder.contains(.nowplaying) してから decode している。

Image とか String -> Int の変換とかは こっち で先にやっていたので使い回せて便利。

public struct RecentTrack: Decodable {
    public let name: String
    public let image: Image
    public let loved: Bool?
    public let streamable: Bool
    public let mbid: String
    public let url: URL
    public let date: Date?
    public let nowplaying: Bool
    public let album: Album
    public let artist: RecentArtist

    private enum CodingKeys: String, CodingKey {
        case name
        case image
        case loved
        case streamable
        case mbid
        case url
        case date
        case album
        case artist
        case nowplaying = "@attr"
    }

    private enum NowplayingKeys: String, CodingKey {
        case nowplaying
    }

    public init(from decoder: Decoder) throws {
        let decoder = try decoder.container(keyedBy: CodingKeys.self)

        name = try decoder.decode(String.self, forKey: .name)
        image = try decoder.decode(ImageDecodableMap.self, forKey: .image).decoded
        let loved = try decoder.decodeIfPresent(StringCodableMap<Int>.self, forKey: .loved)?.decoded
        self.loved = loved == nil ? nil : loved == 1
        streamable = try decoder.decode(StringCodableMap<Int>.self, forKey: .streamable).decoded == 1
        mbid = try decoder.decode(String.self, forKey: .mbid)
        url = try decoder.decode(URL.self, forKey: .url)
        date = try decoder.decodeIfPresent(DateDecodableMap.self, forKey: .date)?.decoded
        album = try decoder.decode(Album.self, forKey: .album)
        artist = try decoder.decode(RecentArtist.self, forKey: .artist)
        if decoder.contains(.nowplaying) {
            let nowplayingDecoder = try decoder.nestedContainer(keyedBy: NowplayingKeys.self, forKey: .nowplaying)
            nowplaying = try nowplayingDecoder.decodeIfPresent(StringCodableMap<Bool>.self, forKey: .nowplaying)?.decoded ?? false
        } else {
            nowplaying = false
        }
    }
}

最終的には LastfmClient/RecentTrack.swift な感じになった。

本当はもっとややこしくて、 extended=0API 投げると loved や data が帰ってこなかったりするのだが、それは decodeIfPresent でなんとかなる。

おわり

Codable 良いのだが、汚い API は Decode するだけで無限に時間を消費しててつらい。

イケてない JSON を Swift の Decodable で扱いやすいモデルにデコードする

last.fm というサービスがあって、API も公開されているのでそれを Swift で使っているのだが、JSON の構造がイケてなくて苦労している。

こんな感じの JSON があったとする。

{
    "user": {
        "name": "RJ",
        "age": "20",
        "image": [
           {
               "#text": "https://lastfm-img2.akamaized.net/i/u/34s/aaa.png",
               "size": "small"
           },
           {
               "#text": "https://lastfm-img2.akamaized.net/i/u/64s/bbb.png",
               "size": "medium"
           }
       ],
        "url": "https://www.last.fm/user/RJ",
        "registered": {
            "#text": 1037793040,
            "unixtime": "1037793040"
        }
    }
}

image はどんな user でも small, medium しかないので array である必要はないし、age は Int だし、 registered も Date 型で扱いたい。あとトップレベルが user だけど、 user を消して階層も1段上にあげたい。

つまりこんな感じのモデルにマッピングしたい。

public struct Image: Decodable {
    public let small: URL?
    public let medium: URL?
}

public struct User: Decodable {
    public let name: String
    public let age: Int
    public let url: URL
    public let registered: Date
    public let image: Image
}

ネストした構造を 1 段上に上げる

user.name の構造だけど、これを name として decode したい。
一旦 user を decode して、さらに name を decode すれば良さそう。

public struct User: Decodable {
    public let name: String
    ....

    private enum CodingKeys: String, CodingKey {
        case name
        ....
    }

    private enum UserKeys: String, CodingKey {
        case user
    }

    public init(from decoder: Decoder) throws {
        let values = try decoder.container(keyedBy: UserKeys.self)

        let user = try values.nestedContainer(keyedBy: CodingKeys.self, forKey: .user)
        name = try user.decode(String.self, forKey: .name)
        ....
    }
}

String を Int にする

Swift 4 JSON Decodable simplest way to decode type change - Stack Overflow を参考にした。

  • LosslessStringConvertible
    • 100 と "100", 10.0 と "10.0" みたいに String と数値をいい感じに変換できる時に使える
  • decoder.singleValueContainer()
    • 1つしか値を持っていない場合限定で使う
struct StringCodableMap<Decoded: LosslessStringConvertible>: Decodable {
    var decoded: Decoded

    init(_ decoded: Decoded) {
        self.decoded = decoded
    }

    init(from decoder: Decoder) throws {
        let container = try decoder.singleValueContainer()
        let decodedString = try container.decode(String.self)

        guard let decoded = Decoded(decodedString) else {
            throw DecodingError.dataCorruptedError(
                in: container, debugDescription: """
                The string \(decodedString) is not representable as a \(Decoded.self)
                """
            )
        }

        self.decoded = decoded
    }
}

...

    public init(from decoder: Decoder) throws {
        let values = try decoder.container(keyedBy: UserKeys.self)

        let user = try values.nestedContainer(keyedBy: CodingKeys.self, forKey: .user)
        name = try user.decode(String.self, forKey: .name)
        age = try user.decode(StringCodableMap<Int>.self, forKey: .age).decoded
    }

ググるInt(try values.decode(String.self, forKey: .age)) ?? 0 などが出て確かに手軽だけど、Optional を 0 で握りつぶしたくないし使いまわせる形にしたかったので StringCodableMap を定義する方法にした。

registered オブジェクトを Date 型にする

       "registered": {
            "#text": 1037793040,
            "unixtime": "1037793040"
        }

これを registered: Date で扱えるようにする。

StringCodableMap のようにカスタム Decodable を定義した。やっていることは今までの応用。
いったん registered を decode して、 #text を取り出して Int に変換して、それを Date にしている。

struct RegisteredDecodableMap: Decodable {
    var decoded: Date

    enum Registered: String, CodingKey {
        case text = "#text"
    }

    init(from decoder: Decoder) throws {
        let container = try decoder.container(keyedBy: Registered.self)
        let time = try container.decode(Double.self, forKey: .text)
        let decoded = Date(timeIntervalSince1970: time)
        self.decoded = decoded
    }
}

...

    public init(from decoder: Decoder) throws {
        let values = try decoder.container(keyedBy: UserKeys.self)

        let user = try values.nestedContainer(keyedBy: CodingKeys.self, forKey: .user)
        name = try user.decode(String.self, forKey: .name)
        age = try user.decode(StringCodableMap<Int>.self, forKey: .age).decoded
        registered = try user.decode(RegisteredDecodableMap.self, forKey: .registered).decoded
    }

Array の image を普通のパラメータにする

       "image": [
            {
                "#text": "https://lastfm-img2.akamaized.net/i/u/34s/aaa.png",
                "size": "small"
            },
            {
                "#text": "https://lastfm-img2.akamaized.net/i/u/64s/bbb.png",
                "size": "medium"
            }
        ],

これを image.small, image.medium でアクセスできるようにする。

これもカスタム Decodable を作る。

  • try decoder.unkeyedContainer()
    • key のないもの、例えば Array などに使う (Dictionary も?)
  • while !unkeyedContainer.isAtEnd
    • Array なのでループで回す。ループの中で一旦 Decode する
    • それを配列で保存しておいて、あとで small, medium にマッピングする
struct ImageDecodableMap: Decodable {
    var decoded: Image

    enum Size: String, Codable {
        case small
        case medium
    }

    struct _Image: Decodable {
        let text: String
        let size: Size

        enum CodingKeys: String, CodingKey {
            case text = "#text"
            case size
        }
    }

    init(from decoder: Decoder) throws {
        var images: [_Image] = []
        var unkeyedContainer = try decoder.unkeyedContainer()
        while !unkeyedContainer.isAtEnd {
            let image = try unkeyedContainer.decode(_Image.self)
            images.append(image)
        }
        var small: URL?
        var medium: URL?
        images.forEach { img in
            let url = URL(string: img.text)
            switch img.size {
            case .small:
                small = url
            case .medium:
                medium = url
            }
        }

        self.decoded = Entity.Image(small: small, medium: medium)
    }
}

...

    public init(from decoder: Decoder) throws {
        let values = try decoder.container(keyedBy: UserKeys.self)

        let user = try values.nestedContainer(keyedBy: CodingKeys.self, forKey: .user)
        name = try user.decode(String.self, forKey: .name)
        age = try user.decode(StringCodableMap<Int>.self, forKey: .age).decoded
        registered = try user.decode(RegisteredDecodableMap.self, forKey: .registered).decoded
        image = try user.decode(ImageDecodableMap.self, forKey: .image).decoded
    }

おわり

最終的にこんな感じになった。 LastfmClient/Entity.swift at master · starhoshi/LastfmClient · GitHub

複雑な JSON を平坦にしたいだけだったのだが、結構大変だった。
extension KeyedDecodingContainer する方法もあるようだし、どっちがより良いのかはわからないけど、とりあえず汎用的に使いまわせるようにできたので悪くない気がしている。

参考

npm ライブラリの README にバッジをたくさんつける

こんな感じにバッジたくさん出してみた。

f:id:star__hoshi:20180212015753p:plain

starhoshi/rescue-fire

npm version badge

npm version

Version Badge for npm, RubyGems, PyPI, Bower and other packages で取得できる。
自分の package を検索して badge の URL を取得できる。

travis-ci

Build Status

テストがなくても、 lint をするだけに CI してもいいと思う。

セットアップ方法は npm ライブラリを travis-ci でテストして Coveralls でカバレッジを計測する - Qiita に書いた。

Coveralls

Coverage Status

テストカバレッジを出している。テストが書かれてないと出せない。

セットアップ方法は npm ライブラリを travis-ci でテストして Coveralls でカバレッジを計測する - Qiita に書いた。

Cadacy

Codacy Badge

コードの品質を出してくれるサービス。 GitHub 連携して、 Settings から Badge を取得できる。

TypeScript で JavaScript を生成していると JavaScript が汚くて点数が落ちるので、 IgnoreFiles でソースファイルだけ指定すると良い。

f:id:star__hoshi:20180212020909p:plain

License

License: MIT

License Badges for your Project のをコピって貼るだけ。

nodei.co (やってない)

NPM

ダサいのでこれはやらなかった。 npm の install 数とかが見れるっぽい。

Bootcamp で Mac に Windows を無料でインストールする

無料といってもクラックするとかではなく、 Windows Insider Program というのを使って OS をダウンロードできる。

Windows Insider Program

要はベータ版を使うことになる、製品版ではないのでバグを踏むリスクが高くなる。

insider.windows.com

ボタンをぽちぽちして Insider になって OS を DL するだけなので簡単。
今回は Windows10_InsiderPreview_x64_ja-jp_17025.iso というのを DL した。

Bootcamp

インストールは普通に Bootcamp アプリを起動してボタンをぽちぽちする。

インストールには USB メモリなどの外部記憶装置が必要になる、家に USB メモリがなかったのでこれを買ったが小さくて差しっぱにできるので良い。
Prime Now で買ったので2時間後に届いた、Amazon すごい。

Amazon | SanDisk Cruzer Fit USBフラッシュメモリー 32GB [国内正規品] SDCZ33-032G-J57 | サンディスク | パソコン・周辺機器 通販

Bootcamp のインストール方法は下記が参考になる。

これでベータ版の Windows がインストールできた。
2014年の MacBookPro に入れて使っているが、USキーボードだとキーバインドが合わなくて厳しい。
スペックは普通に使うぶんには問題ないけど、ゲームとかやるのは厳しい感じだった。

おまけ

評価版はダメだった

無料で使えるやつっていったら評価版だよな、というのが頭にあったので評価版の Windows を入れてみたんだけど、エラーが出てダメだった。

www.microsoft.com

エラーは下記で、

起動可能なUSBドライブを作成できませんでした
ディスクに十分な空き領域がありません。

USB メモリは 32GB だし問題なさそうなのになんでだ、と思ってググっていたら iso ファイルによってはできなかったりするっぽい。
Insider Program の方は USB メモリの問題は出なかったので結局評価版は使わなかった。